How do I load video files onto my KidiBuzz™ 3?
KidiBuzz™ 3 supports MP4 files formatted with the H.264 video codec. Other video formats can be converted to this supported format using third party software (not included).
There may be legal restrictions associated with the use of commercial video files, movies, programs and other content for which VTech® accepts no responsibility or liability. Users should take responsibility for observing relevant copyright law in their country.
When converting your video for KidiBuzz™ 3, please follow these recommended video settings:
Format: H.264 main profile video and AAC audio in an MP4 file.
Resolution: 800x452 if source is 16:9. Other resolutions are supported but are not optimal for the device.
Video bitrate: 2000 kbps. Other bitrates are supported but are not optimal for the device.
Audio bitrate: 128 kbps constant bitrate. Other bitrates are supported but are not optimal for the device.
Maximum file size: 4 GB (over 4 hours of play time using the recommended settings).
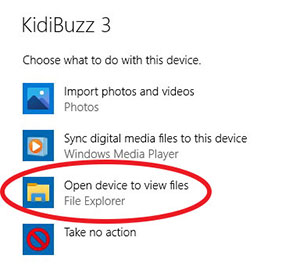
Once your device is connected, the AutoPlay window should open to ask what you would like to do with this device. Choose the option to "Open device to view files".
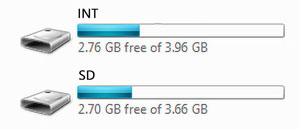
Select "INT" or "SD" depending on where you want to save your videos.
Because video files can take up so much space, we recommend you store them on a microSD card. Your KidiBuzz™ 3 may not have enough memory to support very large video files.
Because video files can take up so much space, we recommend you store them on a microSD card. Your KidiBuzz™ 3 may not have enough memory to support very large video files.
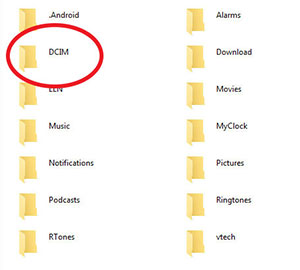
Open the folder labeled "DCIM", then open the folder called "Camera" inside that. Copy the movie file onto your KidiBuzz™ 3 by dragging it from your computer into the folder.
If you want to save the files onto a microSD card, create a new folder called "Videos" in the root of the microSD card and drag your movie files into this new folder.
If you want to save the files onto a microSD card, create a new folder called "Videos" in the root of the microSD card and drag your movie files into this new folder.
Once you've copied the files you want, make sure to eject your device before disconnecting your KidiBuzz™ 3. To do this, just click the Safely Remove Hardware icon on your taskbar, then select the KidiBuzz™ 3. You'll get a notification that it's safe to remove the hardware. You can then unplug your device.
Note: You may not see an Eject option if you are using Windows 10 or later. In this case, it is safe to disconnect the device directly.
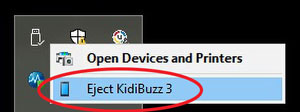
Note: You may not see an Eject option if you are using Windows 10 or later. In this case, it is safe to disconnect the device directly.
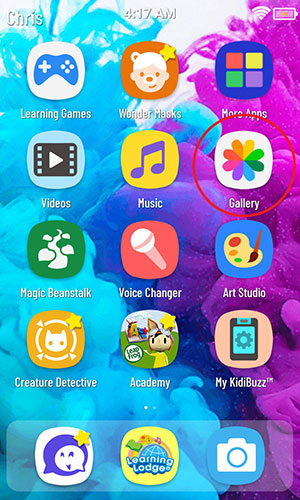
You can find the files you just copied within the Gallery app on your child's Home screen. Select "Gallery" first, then select "Videos" on the next screen.

Mac:
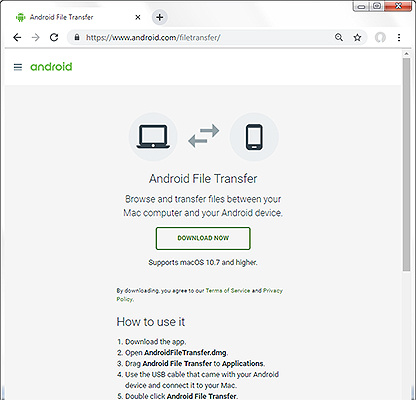
You'll need to download the Android File Transfer application to be able to transfer files from a Mac to your KidiBuzz™ 3. Go to: https://www.android.com/filetransfer/Click the "Download Now" button to save the file to your computer and then follow the instructions on the website to install the application.
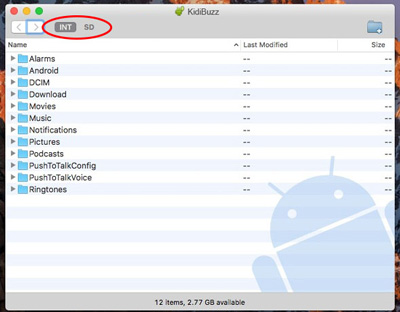
Once it's installed, double click on the Android File Transfer icon on your desktop. Then, double click the "Android File Transfer.app" icon. A directory listing all the files on your KidiBuzz™ 3 will appear.
Select "INT" or "SD" depending on where you want to save your files.
Because video files can take up so much space, we recommend you store them on a microSD card. Your KidiBuzz™ 3 may not have enough memory to support very large video files.
Select "INT" or "SD" depending on where you want to save your files.
Because video files can take up so much space, we recommend you store them on a microSD card. Your KidiBuzz™ 3 may not have enough memory to support very large video files.
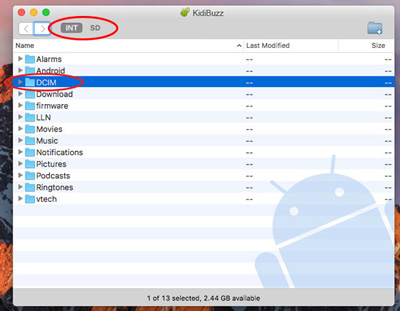
Open the folder labeled "DCIM", then open the folder called "Camera" inside that. Copy the movie file onto your KidiBuzz™ 3 by dragging it from your computer into the folder.
If you want to save the files onto a microSD card, create a new folder called "Videos" in the root of the microSD card and drag your movie files into this new folder.
If you want to save the files onto a microSD card, create a new folder called "Videos" in the root of the microSD card and drag your movie files into this new folder.
You can find the files you just copied within the Gallery app on your child's Home screen. Select "Gallery" first, then select "Videos" on the next screen.